The Model Context Protocol (MCP) has revolutionized how we connect our AI assistants to external tools and data. We’re used to MCP servers that fetch files, query databases, or run commands. But what if your AI could do more than just stream text back at you? What if it could show you a sortable table, an interactive list, or a master-detail view of your data?
I built Visuals MCP to solve exactly this problem. It’s an MCP server designed to give your AI agent a “face” — a canvas to render rich, interactive React components directly within your editor.
Why Text Isn’t Enough

Standard MCP servers are powerful, but they are often limited by the chat interface. If you ask an agent to “list all my active EC2 instances,” it might dump a markdown table or a bulleted list.
- Markdown tables are static. You can’t sort them by CPU usage or filter by region without asking the LLM to rewrite the whole thing.
- Lists get long. Scrolling through hundreds of lines of text is inefficient.
- Images are links. Usually, you get a file path or a URL, not a preview.
An App MCP Server (like Visuals MCP) changes this dynamic. Instead of returning text, the server returns a request to render a UI component. The host application (like VS Code or Claude Desktop) then renders that component, providing a native application-like experience.
Building Visuals MCP
The visuals-mcp project is a TypeScript mono-repo that bundles a Node.js server with a React frontend. It leverages the @modelcontextprotocol/sdk to define tools that don’t just return data, but return instructions to render specific UI components.
The Tech Stack
- Core: TypeScript & Node.js
- Frontend: React 19 & Vite
- Styling: Tailwind CSS
- Components:
@tanstack/react-tablefor powerful data grids
How It Works

When you ask the agent to “show me a table of users,” the flow looks like this:
- User Prompt: “List users in a table.”
- LLM Call: The agent calls the
display_tabletool provided by the MCP server. - Server Response: Instead of a text string of users, the server returns a JSON structure defining the table usage, including columns and data.
- Client Render: The host application receives this structure and renders the interactive React Table component.
This approach effectively decouples the data retrieval from the data presentation, allowing the LLM to act as a controller for your UI.
Deep Dive: Each Visual Is Its Own App

The key architectural insight behind Visuals MCP is that every visual component is a standalone mini-application. The table, the tree view, the list, the image preview, the master-detail layout — each one is an independent React app with its own HTML entry point, its own Vite build config, and its own bundled output.
The File Structure
At the repository root, you’ll find a dedicated HTML file per visual:
mcp-table.html          → entry for the table app
mcp-tree.html           → entry for the tree app
mcp-list.html           → entry for the list app
mcp-image.html          → entry for the image app
mcp-master-detail.html  → entry for the master-detail app
Each HTML file is minimal. It just sets up a root <div> and loads the corresponding React entry point:
<!doctype html>
<html lang="en">
  <head>
    <meta charset="UTF-8" />
    <meta name="viewport" content="width=device-width, initial-scale=1.0" />
    <title>MCP Table Display</title>
  </head>
  <body>
    <div id="root"></div>
    <script type="module" src="/src/table-app.tsx"></script>
  </body>
</html>
That table-app.tsx file is the React entry point. It uses the useApp hook from @modelcontextprotocol/ext-apps/react to connect to the MCP host. This hook manages the lifecycle of the app, receives tool input data from the LLM, handles theme changes, and sends state updates back.
Separate Vite Builds
Each app gets its own Vite config (e.g. vite.config.table.ts). The magic ingredient is the vite-plugin-singlefile plugin, which bundles everything — JS, CSS, assets — into a single self-contained HTML file:
import { defineConfig } from "vite";
import react from "@vitejs/plugin-react";
import { viteSingleFile } from "vite-plugin-singlefile";

export default defineConfig({
  plugins: [react(), viteSingleFile()],
  build: {
    outDir: "dist",
    rollupOptions: {
      input: "./mcp-table.html",
    },
  },
});
The build script runs all five Vite builds in sequence:
npm run build:table && npm run build:image && \
npm run build:master-detail && npm run build:tree && npm run build:list
After the build, the dist/ folder contains five self-contained HTML files, each a fully bundled React application.
How the Server Serves Apps
On the server side (server.ts), two things tie it all together.
1. Tools with resourceUri metadata: Each tool definition includes a _meta.ui.resourceUri property that points the host to the correct HTML resource:
{
  name: "display_table",
  description: "Display an interactive table...",
  inputSchema: { /* columns, rows, title, etc. */ },
  _meta: {
    ui: {
      resourceUri: "table://display",
      visibility: ["model", "app"],
    },
  },
}
The visibility: ["model", "app"] means the tool is accessible both to the LLM (for calling it) and to the app (for receiving results).
2. Resources that serve the HTML: The server registers each app as an MCP resource. When the host requests table://display, the server reads the built single-file HTML from disk and returns it:
server.setRequestHandler(ReadResourceRequestSchema, async request => {
  const { uri } = request.params;
  if (uri === "table://display") {
    const htmlPath = join(__dirname, "mcp-table.html");
    const htmlContent = readFileSync(htmlPath, "utf-8");
    return {
      contents: [{ uri, mimeType: "text/html", text: htmlContent }],
    };
  }
  // ... same pattern for image, tree, list, master-detail
});
The App Lifecycle
Inside each React app, the useApp hook from @modelcontextprotocol/ext-apps establishes bi-directional communication with the host:
const { app } = useApp({
  appInfo: { name: "table-display", version: "1.0.0" },
  onAppCreated: createdApp => {
    // Receive data from the LLM tool call
    createdApp.ontoolinput = params => {
      setTableData(params.arguments);
    };
    // Adapt to the host's light/dark theme
    createdApp.onhostcontextchanged = ctx => {
      applyThemeMode(resolveThemeMode(ctx));
    };
  },
});
This means the app automatically receives the data the LLM passes through the tool call, renders it with a full React component, and adapts its appearance to match the host’s current color theme.
Features of Visuals MCP (Feb 2026)
Here is a glimpse of what visuals-mcp brings to the table (pun intended):
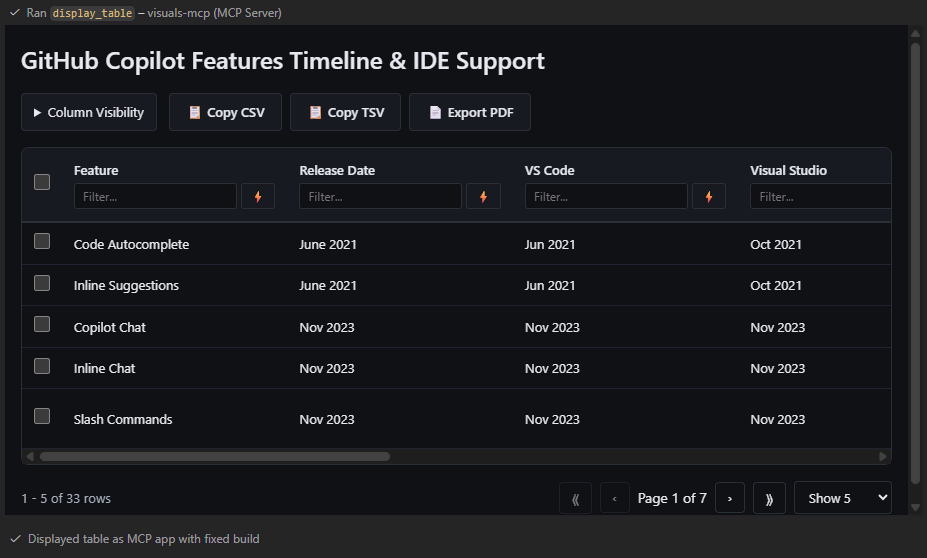
- Interactive Tables: Sort, filter, and paginate through data.
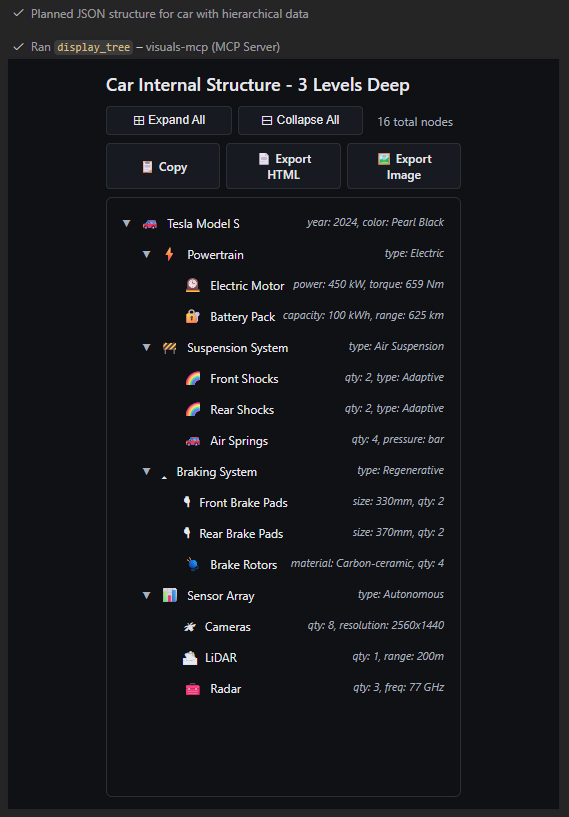
- Tree Views: Visualize hierarchical data like file systems or JSON objects.

- Master-Detail Views: Browse a list on one side and see details on the other—perfect for reviewing logs or code snippets.

-
Interactive Lists: Checkboxes and drag-and-drop reordering that can feed state back to the model.
-
Image Previews: View local or remote images with metadata cards.
Installation Options

One of the great things about the MCP ecosystem is the flexibility in installation. These methods apply not just to visuals-mcp, but to almost any MCP server you might want to use.
1. The Power-User Way: NPM (Generic)
You can run any MCP server using npx or by installing it globally. This works for both VS Code and Claude Desktop.
For VS Code (settings.json):
{
  "github.copilot.chat.mcpServers": {
    "visuals-mcp": {
      "type": "stdio",
      "command": "npx",
      "args": ["-y", "@harrybin/visuals-mcp"]
    }
  }
}
For Claude Desktop (claude_desktop_config.json):
{
  "mcpServers": {
    "visuals-mcp": {
      "command": "npx",
      "args": ["-y", "@harrybin/visuals-mcp"]
    }
  }
}
2. The Easy Way: VS Code Extension
For visuals-mcp specifically, I’ve wrapped it as a VS Code Extension. This is by far the easiest way to get started.
- Open the VS Code Marketplace.
- Search for “Visuals MCP”.
- Install it.
That’s it! The extension automatically registers the MCP server with GitHub Copilot Chat. You don’t need to touch any JSON configuration files. This “server-as-extension” model is a game-changer for adoption, making advanced AI tools accessible to everyone.
Alternatively you can install the extension using these buttons:
°°°
These will install the MCP server as npm package from the npmjs registry: https://www.npmjs.com/package/@harrybin/visuals-mcp
Conclusion
The Model Context Protocol is evolving. We are moving from simple text exchanges to rich, interactive application experiences driven by AI. Whether you want to build your own or just use existing tools, now is the time to explore what MCP can do.
Give Visuals MCP a try and let your agent show you what it really means.