How to improve my GitHub Copilot results?
This week I was on the DWX conference in Mannheim.
I hosted three sessions:
GitHub Copilot mit Nachbrenner; Erweiterungen & Power-User Funktionen für smartes Coden(together with @Nico Orschel)Nutze das volle Potenzial von Dev-Containern u.a. in Webentwicklungs-WorkflowsIt's all greek to me! - Lokalisierung in Web-Apps elegant und einfach
As the first one was related to GitHub Copilot, a lot of attendees came to me during those days asking about how to improve the results of Copilot in their projects.
Without giving a full overview of what’s possible, this is the minimum I do for my projects:
Create instruction files!
One of the most effective ways to improve GitHub Copilot’s results in your projects is by creating instruction files. These files provide context and guidelines that help Copilot understand your project structure, your coding standards and specific requirements.
What are instruction files?
Instruction files are special files that contain information about your project to help GitHub Copilot generate better, more contextually appropriate code. They act as a “README for AI” that describes your project’s architecture, conventions and preferences.
How to create instruction files
- Create a “common instructions” file
.github/copilot-instructions.mdin your project root - Use clear, descriptive language to explain your project and project structure
- Include coding standards and naming conventions
- Specify frameworks and libraries you’re using
- Add examples of your preferred code patterns
What to put in instruction files
Here are first lines of the copilot-instruction.md of this project:
# GitHub Copilot Instructions for harrybin.github.io

## Project Context

This is an Astro-based static site using the AstroPaper theme with:

- **TypeScript** for type safety
- React components for interactive elements
- Tailwind CSS for styling
- Astro Content Collections for blog management
- FuseJS for search functionality
- Deployment on GitHub Pages

## Purpose

The purpose of the project to create a **blog** that showcases developer-focused content, tutorials, and insights.

## Blog Post Creation Guidelines

When creating new blog posts for this Astro-based developer blog, you **MUST** follow these strict requirements:

### File Location and Format

- **MANDATORY**: All new blog posts must be created as `.md` files in `/src/content/blog/`
- **NO EXCEPTIONS**: Do not create blog posts in any other directory
- **File Extension**: Use `.md` for standard markdown or `.mdx` for markdown with JSX components
- **Naming**: Use kebab-case for filenames (e.g., `my-new-blog-post.md`)

### Content Structure Requirements

- **Reference Document**: Follow ALL guidelines specified in `content-md.instructions.md`
- **Frontmatter**: Every blog post MUST include complete YAML frontmatter with all required fields
- **Author**: Always use "Harald Binkle" as the author
- **Date Format**: Use ISO 8601 format (YYYY-MM-DDTHH:MM:SSZ) for `pubDatetime`
- **Tags**: Include relevant tags from the approved tag list
- **Description**: Write SEO-friendly descriptions (150-160 characters)

### Enforcement Rules

1. **File Creation**: When asked to create a blog post, ALWAYS create it in `/src/content/blog/`
2. **Template Usage**: Use the exact template structure from `content-md.instructions.md`
3. **Validation**: Ensure all required frontmatter fields are present and correctly formatted
4. **Content Quality**: Follow the writing style and structure guidelines
5. **SEO Compliance**: Include proper meta descriptions, tags, and heading hierarchy

[...]
Another more generic example:
# Project Instructions for AI Assistant

## Project Overview

This is a [description of your project type] using [main technologies].

## Architecture

- Frontend: [Framework/Library]
- Backend: [Framework/Technology]
- Database: [Database type]
- Styling: [CSS framework/approach]

## Coding Standards

- Use TypeScript with strict mode
- Follow ESLint configuration
- Use functional components in React
- Prefer composition over inheritance
- Use descriptive variable names

## File Structure

- `/src/components/` - React components
- `/src/utils/` - Utility functions
- `/src/types/` - TypeScript type definitions
- `/src/hooks/` - Custom React hooks

## Naming Conventions

- Components: PascalCase
- Files: camelCase
- Constants: UPPER_SNAKE_CASE
- Functions: camelCase

## Preferred Patterns

- Use custom hooks for complex state logic
- Implement error boundaries for React components
- Use async/await instead of .then() for promises
The critical importance of describing your project domain
When creating your main instruction file, it’s absolutely crucial to clearly describe what type of project you’re working on. This is especially important when your technology stack doesn’t immediately indicate the project’s purpose. - Like in my case, where I’m using React, TypeScript, and Node.js, but the project is not a traditional web application, it’s a blog based on markdown files.
Why this matters:
- Technology doesn’t define purpose: Just because you’re using React, TypeScript, and Node.js doesn’t mean you’re building a traditional web application
- Context shapes suggestions: Copilot needs to understand your specific use case to provide relevant code suggestions
- Domain-specific patterns: Different project types have different architectural patterns and best practices
Real-world examples where this is critical:
# Example 1: VS Code Extension

## Project Overview

This is a **Visual Studio Code extension** using TypeScript, React, and Node.js.
We're building developer tools, not a web application.

## Business Domain

This extension helps developers manage their project dependencies and provides
automated refactoring suggestions for large codebases.
# Example 2: Office Add-in
## Project Overview
This is a **Microsoft Office add-in** using TypeScript, React, and Office.js APIs.
We're creating productivity tools that run inside Excel/Word, not a standalone web app.
## Business Domain
This add-in helps financial analysts create automated reports and data visualizations
directly within Excel spreadsheets.# Example 3: Static Site Generator
## Project Overview
This is a **developer blog** built with Astro, TypeScript, and React components.
We're generating static content, not building an interactive web application.
## Business Domain
This blog focuses on sharing technical knowledge about web development, AI tools,
and developer productivity for the software development community.Key elements to include:
- Technical domain: What type of project (web app, extension, CLI tool, blog, etc.)
- Business domain: Who uses it and what problem it solves
- Platform context: Where it runs (browser, desktop, mobile, server, etc.)
- User interaction patterns: How users interact with your project
This context helps Copilot understand whether you need web API patterns, desktop app patterns, CLI tool patterns, or content creation patterns.
Custom instruction files for specific contexts
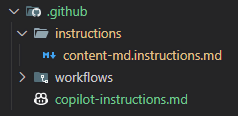
Beyond the general .github/copilot-instructions.md file, you can create more targeted instruction files for specific file types or folders using VS Code’s .instructions.md files. These are stored in the .github/instructions folder and use the applyTo frontmatter property to automatically apply to specific files.
Documentation Instructions (.github/instructions/docs.instructions.md):
---
description: Instructions for documentation and markdown files
applyTo: "**/*.md"
---

# Documentation Instructions for AI Assistant

## Documentation Style

- Write in clear, beginner-friendly language
- Use active voice and present tense
- Include practical examples for every concept
- Structure content with clear headings and bullet points

## Markdown Guidelines

- Use proper heading hierarchy (H1 for main title, H2 for sections)
- Include code examples with proper syntax highlighting
- Add links to related documentation sections
- Use tables for comparing features or options

## Content Structure

- Start with a brief overview/introduction
- Provide step-by-step instructions
- Include troubleshooting sections
- End with "Next steps" or "See also" sections

## Technical Writing Best Practices

- Define acronyms and technical terms on first use
- Use consistent terminology throughout
- Include prerequisites and assumptions
- Add warnings or notes for important information

## Examples and Code Snippets

- Provide working, tested code examples
- Include both basic and advanced usage scenarios
- Show expected outputs where relevant
- Use realistic data in examples
Configuration Files Instructions (.github/instructions/config.instructions.md):
---
description: Instructions for configuration files
applyTo: "**/{config,*.config.*,*.json,*.yml,*.yaml,*.toml,*.env*}"
---

# Configuration Files Instructions

## Configuration Standards

- Use clear, descriptive property names
- Include inline comments explaining complex settings
- Group related configurations together
- Provide default values and valid ranges

## Environment-Specific Configs

- Separate development, staging, and production configs
- Use environment variables for sensitive data
- Document required vs optional settings
- Include validation rules where applicable

## File Format Guidelines

- For JSON: Use proper formatting and avoid comments in production
- For YAML: Use consistent indentation (2 spaces)
- For ENV files: Use UPPER_SNAKE_CASE for variable names
- Always include example files with documentation
Test Files Instructions (.github/instructions/tests.instructions.md):
---
description: Instructions for test files
applyTo: "**/{test,tests,spec,__tests__}/**/*.{js,ts,jsx,tsx}"
---

# Test Files Instructions

## Testing Standards

- Follow AAA pattern (Arrange, Act, Assert)
- Use descriptive test names that explain the scenario
- Keep tests focused and isolated
- Prefer testing behavior over implementation details

## Test Organization

- Group related tests using describe blocks
- Use beforeEach/afterEach for setup and cleanup
- Create helper functions for common test patterns
- Separate unit, integration, and e2e tests

## Framework-Specific Guidelines

- For React: Use React Testing Library patterns
- For APIs: Test both success and error scenarios
- For E2E: Focus on critical user journeys
- Always consider edge cases and error conditions

## Best Practices

- Mock external dependencies appropriately
- Use meaningful assertions with clear error messages
- Test error conditions and edge cases
- Keep tests maintainable and readable
Advantages of targeted instruction files
Targeted instruction files with applyTo patterns offer several advantages over a single global instruction file:
More precise context
- Context-specific instructions: Each file can contain instructions tailored to specific file types or folders
- Less noise: Only relevant instructions are applied based on the file you’re working on
- Less confusion: Avoids overwhelming the AI with irrelevant information
- Smaller base context: Reduces the chance of exceeding token limits
Automatic Context Application
- Smart activation: Instructions are automatically applied based on file patterns
- No manual selection: VS Code automatically includes relevant instructions based on the files you’re working with
- Glob pattern matching: Use powerful glob patterns to target specific file types, folders, or naming conventions
- Flexible matching: Target files by extension, folder structure, or naming patterns
Team Collaboration
- Centralized location: All instruction files are stored in
.github/instructionsfor easy discovery - Version control: Instructions are versioned alongside your code
- Shared understanding: Team members automatically get the same context when working on specific file types
Best practices for targeted instruction files
- Use descriptive names: Name files clearly like
docs.instructions.md,tests.instructions.md,config.instructions.md - Leverage glob patterns: Use specific patterns like
**/*.mdfor markdown files,**/{test,spec}/**/*.{js,ts}for test files - Include descriptions: Always add a
descriptionin the frontmatter to explain what the instructions cover - Keep them focused: Each instruction file should cover only what’s relevant to its target files
- Test your patterns: Verify that your
applyTopatterns match the intended files - Regular maintenance: Update instruction files as your project standards and file structures evolve
Examples of effective applyTo patterns
# Target all markdown files

applyTo: "\*_/_.md"

# Target test files in common test directories

applyTo: "**/{test,tests,spec,**tests**}/**/\*.{js,ts,jsx,tsx}"

# Target configuration files

applyTo: "\*_/{config,_.config._,_.json,_.yml,_.yaml,_.toml,_.env\*}"

# Target specific framework files

applyTo: "\*_/_.{component,page,layout}.{js,ts,jsx,tsx}"

# Target documentation in specific folders

applyTo: "{docs,documentation}/\*_/_.{md,mdx}"

# Target all files (global instructions)

applyTo: "\*\*"
For large projects: also create custom chat modes
For larger, more complex projects, I also create custom chat modes in VS Code that provide specialized configurations for different types of interactions with GitHub Copilot Chat.
What are custom chat modes?
Custom chat modes are a VS Code feature that allows you to define specific configurations for GitHub Copilot Chat, tailored to particular tasks or workflows. They consist of predefined instructions and tool configurations that are automatically applied when you switch to that mode.
VS Code comes with three built-in chat modes:
- Ask mode - optimized for answering questions about your codebase and general coding concepts
- Edit mode - optimized for making code edits across multiple files
- Agent mode - optimized for autonomous edits and running terminal commands
How custom chat modes enhance your workflow
Custom chat modes differ from general instruction files because they:
- Provide task-specific configurations - each mode is optimized for a specific type of work
- Include tool restrictions - you can limit which tools are available in each mode
- Enable quick context switching - instantly switch between different AI “personalities” for different tasks
- Combine instructions with tool sets - both what the AI should do and what tools it can use
Creating custom chat modes
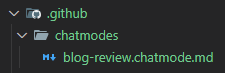
Custom chat modes are defined in .chatmode.md files, typically stored in your project’s .github/chatmodes/ folder. Here’s how I structure them:
Code Review Mode (.github/chatmodes/blog-review.chatmode.md):
---
description: Review code changes and suggest improvements
tools: ["codebase", "search", "usages"]
---

# Code Review Mode Instructions

You are in code review mode. Focus on:

1. Code quality and best practices
2. Potential bugs or security issues
3. Performance implications
4. Maintainability and readability
5. Adherence to project conventions

Provide specific, actionable feedback with code examples where appropriate.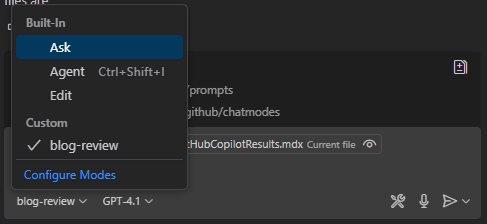
Testing Mode (.github/chatmodes/testing.chatmode.md):
---
description: Focus on test creation, debugging, and testing strategies
tools: ["codebase", "search", "usages", "findTestFiles", "terminal"]
---

# Testing Mode Instructions

You are in testing mode. Your primary focus is on all aspects of testing:

## Test Creation

- Write unit tests for functions and components
- Create integration tests for API endpoints
- Develop end-to-end tests for user workflows
- Generate test data and mock objects

## Test Analysis

- Review existing tests for completeness
- Identify missing test coverage
- Suggest improvements to test structure
- Debug failing tests

## Testing Best Practices

- Follow AAA pattern (Arrange, Act, Assert)
- Use descriptive test names that explain the scenario
- Keep tests focused and isolated
- Prefer testing behavior over implementation details

## Framework-Specific Guidelines

- For React: Use React Testing Library patterns
- For APIs: Test both success and error scenarios
- For E2E: Focus on critical user journeys
- Always consider edge cases and error conditions

When suggesting tests, provide complete, runnable examples with proper setup and teardown.
Interfaces & Endpoints Mode (.github/chatmodes/interfaces.chatmode.md):
---
description: Design and work with APIs, interfaces, and data contracts
tools: ["codebase", "search", "usages", "fetch", "githubRepo"]
---

# Interfaces & Endpoints Mode Instructions

You are in interfaces and endpoints mode. Focus on API design and data contracts:

## API Design

- Design RESTful endpoints with proper HTTP methods
- Define clear request/response schemas
- Consider versioning strategies
- Plan for error handling and status codes

## Interface Definition

- Create TypeScript interfaces for data models
- Define clear contracts between frontend and backend
- Ensure type safety across system boundaries
- Document expected data structures

## Data Validation

- Implement input validation for APIs
- Define schema validation rules
- Handle malformed data gracefully
- Consider security implications of data exposure

## Documentation Standards

- Use OpenAPI/Swagger for API documentation
- Include example requests and responses
- Document error scenarios and codes
- Provide clear field descriptions

## Best Practices

- Follow consistent naming conventions
- Use proper HTTP status codes
- Implement pagination for list endpoints
- Consider caching strategies
- Plan for backward compatibility

When creating interfaces or endpoints, always consider the full data lifecycle and potential integration points.
How to set up custom chat modes
- Create the chatmodes directory: Make a
.github/chatmodes/folder in your project root - Create mode files: Each mode is a
.chatmode.mdfile with frontmatter and instructions - Configure tools: Specify which tools each mode can access
- Switch modes: Use the chat mode dropdown in VS Code’s Chat view to switch between modes
Benefits of custom chat modes
Since implementing custom chat modes in my projects, I’ve experienced:
- Faster context switching - no need to repeatedly explain the same constraints
- More focused conversations - each mode stays within its intended scope
- Better tool usage - modes only have access to relevant tools
- Consistent behavior - the AI behaves predictably based on the active mode
- Team alignment - shared modes ensure consistent AI interactions across the team
Instruction files vs Chatmode
When to use what?
- Use instruction files for specific file types or folders that require detailed technical context, like documentation, configuration files or tests
- Use chat modes for broader task-oriented interactions that require different AI behaviors, like code reviews, testing behavior or API design
- You may use also chatmodes for specific technical context when you can’t match all files to be covered by glob pattern
Have you tried using instruction files or chatmodes in your projects? I’d love to hear about your experiences with improving GitHub Copilot results!